


10 Years of the Nisqually Community Garden![]()
By Chantay Anderson, Janell Blacketer, Carlin Briner and Grace Ann Byrd
![]() Download this article (with additional photos)
Download this article (with additional photos)
 The Nisqually Community Garden celebrated 10 years this summer and we wrapped up another successful season with the annual Harvest Party on October 15th, 2019. The event was well attended and featured a seasonal dinner, cider pressing with the apples from the Garden, and an abundant giveaway of food and medicine. We would like to give a big thanks to our volunteers, the Youth Center staff, and our garden staff,especially our extraordinary seasonal crew as they are finishing up their work for the year.
As we continually gather community feedback,our programing has grown and evolved over the years. In the past couple years we have increased services to Nisqually Elders. This year we completed our second season of the Elders Home Delivery program –this year24 Nisqually Elders received a box of assorted produce from the Garden each week through the peak season.
Also, in collaboration with the Nisqually AmeriCorps crew, we built raised garden beds in the yards of 5 Elders and provided seeds and starts for their own gardens.We will continue to build raised garden beds for 5 Elders each spring. In addition to increasing services to Elders, we have also expanded our nutrition education and medicinal plant program over the past several years. We regularly collaborate with the Zumba and Yoga classes that the Tribe offers to employees at noon throughout the week. We bring recipes and produce from the garden(Smoothies, Energy/Protein Bites, Salads, etc.) and in doing this it shows that taking care of yourself inside and out is available to you around Nisqually.
We also deliver medicines and hold medicine-making workshops in partnership with many different Tribal programs. We take roots and honey to the Elders, stress and anxiety plants and tinctures to Substance Abuse and most departments have made a Nourishing Healing Salve or Trauma Balm with us. It’s exciting to work with all of you and we plan on making more classes with different plant remedies all year. A special Thanks to those who have gone into the wild with us to harvest Cottonwood Buds, Devil’s Club, Salal and Hawthorn, or anyone who has donated wild plants. The Garden Crew gathers wild plants all year and usually has tea available.
Though the main season of produce distribution has ended, we will continue to harvest and deliver produce for Elders only to the Nisqually Elders Center every Monday at noon through December. We will also be doing more workshops through the winter season so look for more information about upcoming classes!
![]() Click here to view and download the full article (with garden event photos from the 2019 season as posted in the Squalli-Absch newsletter).
Click here to view and download the full article (with garden event photos from the 2019 season as posted in the Squalli-Absch newsletter).
Building Healthy Soil
By Elizabeth Campbell ![]() Download this article
Download this article
 Soil is the most important part of your garden. If your soil is healthy, it is actually alive! According to Seattle Tilth, one gram of healthy soil is home to as many as 500 million beings including bacteria, yeast, algae, protozoa, etc. These microscopic creatures can fix nutrients, hold water and ward off disease. If the soil is full of nutrients, your plants will be healthy and robust. If the soil is poor, your plants will struggle for survival. Just as people get run down when they are not eating enough good food, plants will wilt when they are hungry. One of the best ways to feed your soil is to introduce compost. You can also feed your soil by mulching with organic material. Leaves are a preferred mulch that almost everyone has access to. As they break down, they re-introduce nutrients into the soil.
For example, when you go out in an established forest and pick up the soil, it will feel light and loamy. The color is usually dark and if you look closely, you will see tiny bugs, beetles and other creatures in the soil. This is what we want to create in a garden – living soil. If your soil has a lot of clay, where water sits on the surface, you can add compost, mulch and sand to help break it up. If your soil is sandy, adding compost will improve its ability to hold moisture.
Traditional Northwest Coastal ways of building soil health include teachings from our animals. For instance, salmon swim up our rivers and into the tiny streams all over the Northwest. The eagles and the bear carry these fish carcasses up into the forest where they continue to break down and fertilize the earth. Planting salmon under corn is an old Indian tradition that has proven worthy over the centuries. Salmon carcasses add nitrogen, phosphorous, calcium and trace elements back into the soil. If you have access to fish carcasses and seaweed, then you can introduce balanced minerals back into your soil. These are often a part of costly commercial organic fertilizers. You can also dig a hole between plants to put the carcass in. Bury it deep enough so that dogs will not dig it up, or you will have to deal with the stink later! Some people work crushed up oyster shells or other shellfish into their soil. Seaweeds like bull kelp and Bladderwrack are high in potassium and all the trace minerals in seawater. Seaweed can be worked into the surface of the soil. You can cut up big pieces so they will compost more quickly. Remember, the minerals that you put back in the soil will be taken up by the plants to increase their strength and vitality, and then by you. It is worth the effort for your health.
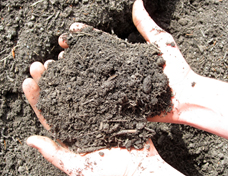
Compost: Compost is being made all the time in nature. Imagine yourself in the forest. What do you see, smell, feel and hear? Cool damp air? Birds, squirrels and other animals? Get down and look closely as dead leaves fall, decay and turn into nutrient-rich soil for living plants. This cannot be done without the help of tiny bacteria, microorganisms, and insects that live in the soil. We can speed up the process of composting at home by creating the right environment.
A composting family can reduce their waste by as much as 50%. Rather than sending food scraps and yard waste to the dump, you can turn them into something beneficial for your plants. Compost is key to a healthy garden.
There are many great resources on composting. You can get as simple or as complicated as you choose. You can compost in an open pile in your back yard, in a hole in the ground, in a container, or even in a garbage can.
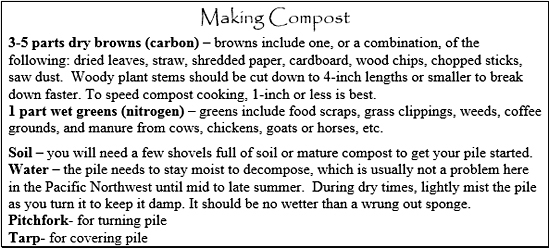
To start a compost pile you will need about one cubic yard (3’x3’x3’) of the basic recipe. This size will heat up and decompose quickly. Smaller piles take longer. Begin by layering with about a six-inch brown layer and a two-inch layer of greens. Repeat. Incorporate several shovels full of soil throughout to introduce beneficial bacteria. Every seven to ten days you will need to turn or fluff the pile with a pitchfork so that the critters in the pile get enough oxygen to thrive. The more often you turn the pile, the sooner your compost will be done. It would not hurt it to turn it several times a week. You can continue adding food scraps to the pile, but make sure to bury them so you do not attract rodents and raccoons.
After a couple of weeks you will notice worms and tiny bugs crawling around in the pile. They are breaking things down for you! In our cool, wet climate, it is best to keep the pile covered. A simple tarp weighed down on the corners will do. Within two to three months you should have beautiful compost that is dark and earthy smelling. When my pile is nearing completion, I start another pile so that I can continue using food scraps. You will know when your compost is finished because it will look and smell like rich dark soil. Allow finished compost to rest/cure about 4 weeks after it has “cooled.” You can sift your compost by placing a screen on top of a wheelbarrow to remove larger particles and return those to your new pile for further decomposition.
Manure: Manure is an affordable source of nitrogen that can easily be incorporated into your compost. Only mature manure from vegetarian animals should be used in compost that will be used on food crops. Cow manure and chicken manure are commonly used. Chickens produce very nitrogen rich manure, as do llama and alpaca. Ideally you want to use manure that has been cured. Manures are very hot, meaning that they are very high in nitrogen and can potentially burn your plants. Uncured manure can also harbor harmful pathogens.
To use in the garden: Simply spread the finished compost over garden areas or directly around plants, as a mulch, so it covers the surface of the soil one to two inches. Mulches can be anything from dried leaves, straw or freshly mowed lawn clippings to finished compost. Mulch covers your soil, suppresses weeds and helps to hold in moisture. The mulch breaks down over time and feeds your soil and protects microorganisms that benefit the soil. If you are planting a new bed, incorporate compost into the soil before planting.
Vermicompost: Who knew worms could be so helpful? Worms can consume half their body weight /day in organic matter, i.e. our garbage. Worm castings (waste) can substantially increase microbial activity in your soil. Humic acid, found in the castings, make the nutrients more available to your plants. Lechade is a nutrient dense liquid that runs off of the worm bin that can be diluted, made into tea and sprayed onto plants as a liquid fertilizer. Worms are typically kept in small bins. Shredded paper can be added to your bin as a bed for the worms and can help keep the bin healthy. Small food scraps can be added to the bin regularly to feed the worms and create a nutrient dense treat for your plants. To learn more, check out the book Worms Eat My Garbage, by Mary Appelhof.
Compost Resources:
WA State Dept of Ecology:
- This site includes a Compost & Healthy Soil Page
Here are a few sites on this page:
- Solid Waste & Recycling Data (including Annual Status Reports)
- Ecology contacts (includes your Region contact and HQ contacts)
U.S. EPA:
Here are a few examples of some of the compost equipment/resources available:
- BW Organics Rotating Drum - The Qualco Dairy/Anaerobic Digester facility in Snohomish County has one of these drums. The builder/operator of the facility is Qualco Energy. They are a non-profit group that represents farmers of the Sno/Sky Agricultural Alliance, Tulalip Tribes, and local environmental groups.
- Earth Tub - According to the manufacturer’s website, this unit is ideal for schools, universities, restaurants, hospitals and supermarkets.
Compost: What Goes in?
By Elizabeth Campbell ![]() Download this article
Download this article
Compost Green Nitrogen Materials:
• Grass clippings, leaves
• Old flowers, plants
• Weeds (not in seed stage)
• Veggie and fruit scraps
• Seaweed
• Livestock manure
• Coffee grounds/filters
• Tea bags
• Eggshells
Dry Brown Carbon materials:
• Untreated wood ash
• Straw
• Dried leaves, twigs
• Aged wood chips/sawdust
• Shredded cardboard and paper
Do NOT compost:
• Meat, fish, fat of any kind
• Bones
• Diseased plant material
• Treated wood, boards, tin, glass, plastic
• Waxy leaved plants
• Pernicious weeds; morning glory, buttercup, quack grass
• Cat, dog, pig manures
• Weeds in seed stage
* When adding kitchen waste, you MUST bury it in the center of the pile and cover it completely with compost to prevent attracting pests!
If pile stinks: Increase oxygen by turning more often and adding more dry brown carbon material throughout.
If the pile is not getting hot: Make sure it is large enough (3 cubic feet), it might need more green nitrogenous material added and/or could need to be lightly misted throughout, turned and covered.
Try to use about 3 times the amount of dry brown materials (dry leaves, shredded cardboard) to each 1 part of green materials (kitchen scraps, grass clippings). The smaller the pieces, the faster they will break down. Lightly mist the pile, while turning, to keep it the consistency of a squeezed sponge. Do not over water! Keep pile covered to retain heat.
Nettle Season is Here!!
By Janell Blacketer, Garden Field Technician ![]() Download this article
Download this article
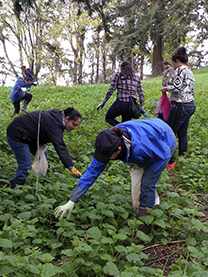
Spring has snuck up on us again! We are very lucky here at Nisqually, for we have our very own patch of nettles at the top of the garden by the Longhouse under the Cedar tree. Here are some helpful tips when harvesting stinging nettles:
- First and foremost always have an offering for the plants you choose to harvest in the wild! It shows respect and gratitude. Never take more than you need, so with nettles we only like to cut the tops off! Doing that will help it flourish for the rest of the year.
- There are many great places that have stinging nettles in the area. There is Priest Point Park, Fry Cove, Woodard Bay and for some of you, deep in your backyard. However, if you choose somewhere popular be sure there is no major roadside traffic and that it is not a chemical agriculture area. Nettles pick up poisons and metals from soil.
- OH, and By the WAY, they sting!!! Some great tools for harvesting are tough gloves and scissors. It has been said, though, that the stinging helps with arthritis and warriors and hunters sting themselves for vitality.
- It is best to gather the nettles before they flower or reach over a foot tall. As the leaves get older they contain cysoliths, which can irritate the kidneys. This compound is destroyed after the leaves are dry, so use any nettles gathered after flowering for dried herb tea.
 Nettles come out in the spring to help our bodies restore from a long, cold winter. They are considered a “Super Food” because they are very high in minerals and vitamins and are a tonic for the liver, kidneys, blood and allergies. They are a great detox when trying to cleanse your body. We want you to know everything you can about nettles, because they are only around for spring and have sooo much power in them that it is best to harvest when they are here!
All the fun things you can make with nettles are very rewarding, and your body will show its appreciation. Cooking nettles can be tricky. To get the sting out you can either blanche them, cook them or dry them. After that the possibilities are endless!!! They work as well as cooking anything with spinach and chard. They can hide easily in many meals as well, if chopped up fine.
The Nisqually Garden thought it would be extremely beneficial for you guys to read this article because the more we know the more we grow! We always welcome Tribal community members to come harvest from our nettle patch at the Garden. If you’d like assistance, please contact us at (360) 456-5221 Ext. 1165, or blacketer.janell@nisqually-nsn.gov.
Nettle is a plant that our ancestors enjoyed, and it can only help lift your spirit to know you are taking advantage of what Mother Earth has to offer us! Here are some yummy recipes to help your experience with this strong medicine! Have fun, be safe and always appreciate.
Disclaimer: Nisqually Indian Tribe does not endorse, promote, review, or warrant the accuracy of the services or links provided.
